

How To Save Gif On Photoshop Cc
Creating an blitheness isn't as complicated as information technology sounds, and the technique comes in handy when you're making web ads, where space is at a premium. In this column, you'll larn to use Photoshop to make an animated GIF that cycles through several images—including ones with text—to create a slideshow that plays automatically on the spider web.
Design the animation
Fire up Photoshop (CS6 Extended or any version of CC) and choose File > New. In the resulting dialog box, enter the blitheness width and superlative (say, 300×250 pixels). Enter 72 for resolution, set the Color Mode menu to RGB, and cull sRGB from the Colour Profile menu.
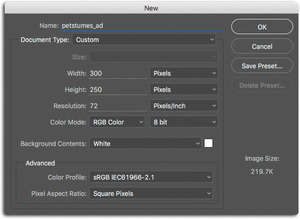
sRGB is the standard colour space for the Internet, so designing in that space avoids colour shifting when you lot save the file.
Next, create the content using layers. To add together images to the certificate, choose File > Place Embedded (File > Place in earlier versions). Photoshop surrounds the paradigm with resizing handles; Shift-drag any corner handle to resize the image so press Return. Repeat for each image. Be sure to include a layer for branding (say, your logo) and a "call to action" layer (say, "click hither to get 50% off your first sitting"). The latter gives your audience an action to do, and lets you estimate the ad's success rate. One time your content is complete, plow off the layer visibility icons (circled) for everything except what you want visible on the starting time frame.
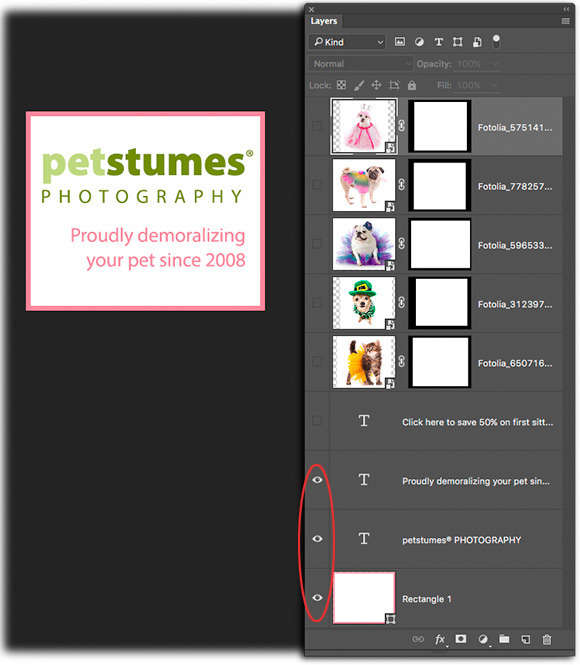
This Layers panel shows all the animation content. As yous can see, but the layers for the get-go frame are visible.
Now cull Window > Timeline. In the resulting panel, click the down-pointing icon to the right of the Create Video Timeline push and cull Create Frame Blitheness. Click the Create Frame Animation push that appears and Photoshop creates one frame representing what's currently visible in the Layers panel. Each frame serves as a placeholder for the content yous want to show onscreen, which you lot control using layer visibility.
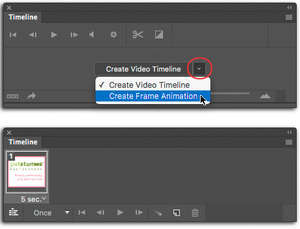
Here's what the Timeline panel looks like when you first open information technology (top) and here's what information technology looks like later on clicking the "Create Frame Animation" push button.
To add a new frame, click the "Duplicate selected frames" button (circled). Since frame content is determined by layer visibility, the new frame is identical to the first one. In the Layers panel, use the visibility icons to display only the layer(s) containing the content for the second frame in your animation. Go on adding frames and adjusting layer visibility until y'all've completed the animation. Here the phone call to action frame appears after the last costume photo, followed past a "blank" frame containing only the background.

Afterward clicking the duplicate push (circled), use layer visibility to brandish the content you want to appear in the 2d frame (top). Adding a bare frame between two text frames (the showtime and final) helps keep text readable in one case the animation loops during playback (bottom).
You can also add a fade transition between frames, which is chosen tweening. To do it, activate the frame you desire to fade into the next one (say, the "call to activity" frame) and click the Tween button (it looks like a diagonal row of squares and it's at left of the duplicate button). In the resulting dialog box, tell Photoshop which frame to tween the active 1 with (Next Frame was used here) and enter how many frames of fading you want in the Frames to Add together field. Click OK and Photoshop adds the new frames (circled).
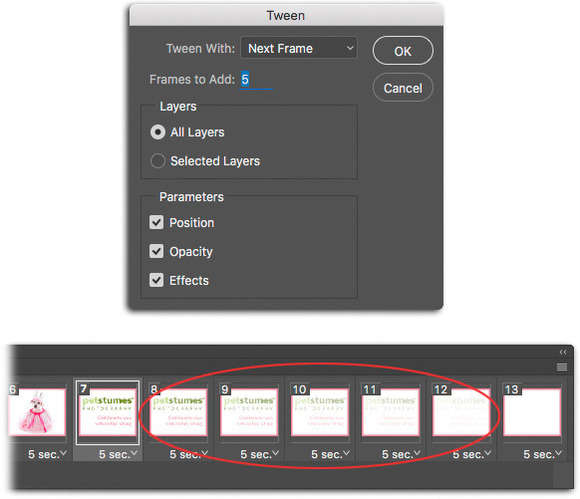
The more frames yous add, the bigger the file size, and then tween with circumspection!
Customize the playback
Utilize the frame filibuster menu below each frame to control how long it's visible. Keep your branding and call to activeness frames onscreen long enough to be read (say, two seconds) and speed up tweened frames (0.v seconds). Adjacent, click the looping options menu (circled) and choose three, so the animation repeats itself three times. Click the Play button (also circled) to preview your handiwork.
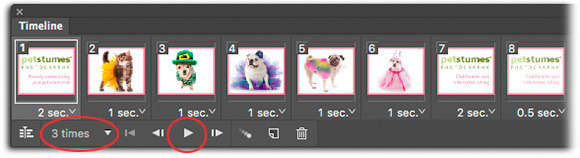
You can set the delay for each frame individually or en masse by Shift- or Command-clicking to activate frames and then changing the duration of one of them.
When you're finished, choose Optimize Animation from the Timeline console's wing-out bill of fare (circled). In the resulting dialog box, exit both options turned on: Bounding Box closely crops each frame to its content and Redundant Pixel Removal makes unchanged pixels transparent in subsequent frames). Choose File > Save Every bit and pick Photoshop from the Format menu to preserve your layers then you lot tin edit them later.
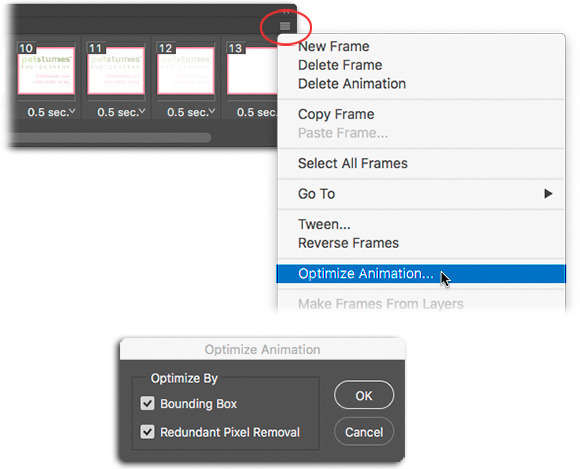
Optimizing your animation keeps the file size small-scale.
Export the file
Cull File > Save for Web in Photoshop CS6 Extended or File > Export > Save for Web in CC and choose GIF from the format menu at upper right (circled). If you've included photographs with gradients in the animation, set up the Dither card to Diffusion and experiment with the amount setting to its right (likewise circled). If your animation doesn't include full-colour photos, endeavour lowering the Colors field to reduce file size. Use the Animation section at lower right (circled) to preview your piece earlier saving it.
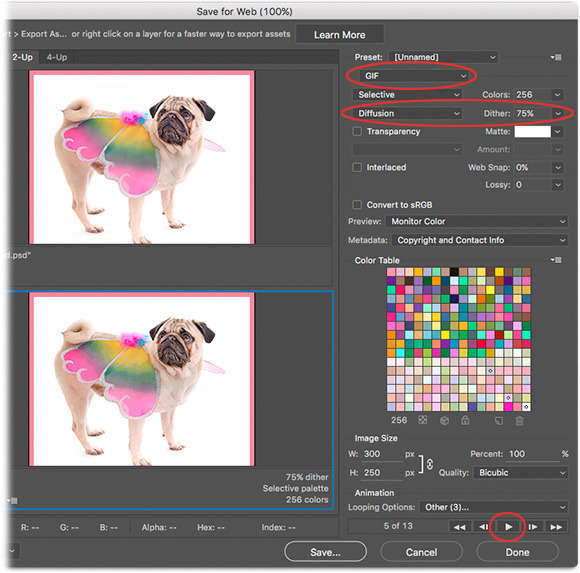
Behold, the mighty Save for Web dialog box.
The resulting GIF will play in any web browser: use the browser's File > Open command or drag and drop the GIF onto a browser window. You lot can also preview it using QuickLook: simply click the file proper noun and press your keyboard's spacebar.
Source: https://www.macworld.com/article/227217/how-to-create-an-animated-gif-in-photoshop.html
Posted by: guinnfrect1959.blogspot.com
0 Response to "How To Save Gif On Photoshop Cc"
Post a Comment